Are you already fed up with the same old boring sidebars on your WordPress site? Want to add a touch of personality and uniqueness to your website? Look no further, because in this article, we’ll be showing you how to create a custom sidebar in WordPress with ease.
Creating a custom sidebar in WordPress is a great way to add a unique and personal touch to your website. It allows you to display content in a new way, without interfering with the design of your page. With a custom sidebar, you can display widgets, advertisements, promotions and more.
You also can use a custom sidebar to easily create a custom navigation menu by adding a menu widget. This will allow your visitors to quickly access important pages on your site without having to scroll all the way to the top of the page. You can also add a search box to your custom sidebar, making it easier for visitors to search for content on your site.
Why Have a Custom Sidebar?
A custom sidebar in WordPress allows you to display specific content or widgets on specific pages or posts, making your website more dynamic and engaging for your visitors. It can also be a great way to increase conversions by highlighting your call-to-actions and important information.
What You’ll Need To Create a Custom Sidebar in WordPress?
Before we dive into creating your custom sidebar in WordPress, there are a few things you’ll need to have ready:
- A self-hosted WordPress site
- A theme that supports custom sidebars (if not, you may need to switch to a different theme or purchase a plugin)
- Access to your WordPress Dashboard
Step 1: Determine What Content Will Go in Your Sidebar
Before you create your custom sidebar, it’s important to determine what content will go in it. This could be anything from a list of your recent posts, a call-to-action button, or a search bar. Having a clear understanding of what you want to include in your sidebar will make the next steps much easier.
Step 2: Create a New Sidebar
Now that you know what content will go in your custom sidebar, it’s time to create it. There are two ways to do this:
- Using a Plugin From WordPress Repository
- Manually Adding the Sidebar to Your Theme’s Functions.php file
Option 1: Use a Plugin
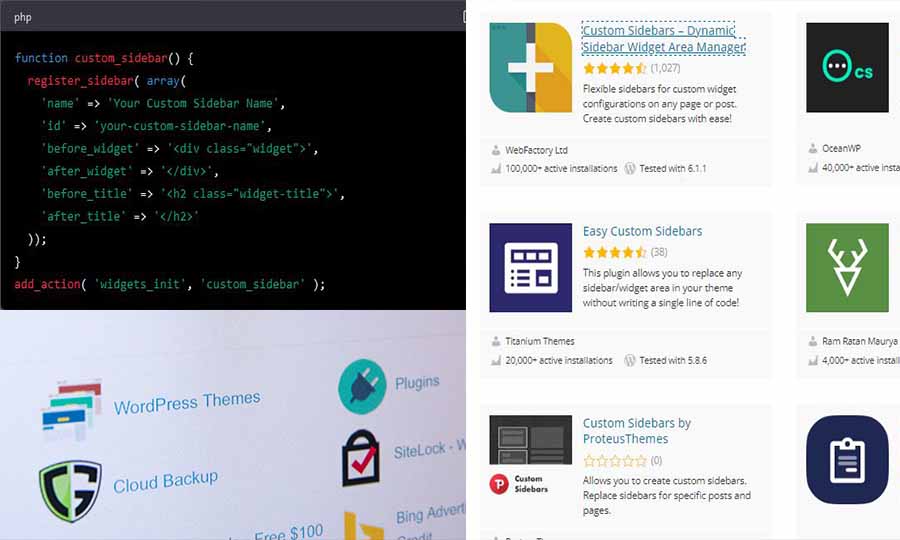
There are many plugins available that make it easy to create custom sidebars in WordPress. One popular option is the Custom Sidebars plugin. Simply install and activate the plugin, then follow the instructions to create your new sidebar.

Option 2: Manually Add the Sidebar to Your Theme’s Functions.php file
If you’re comfortable with code, you can manually add your custom sidebar to your theme’s functions.php file. Here’s how:
- Go to Appearance > Theme Editor in your WordPress Dashboard.
- Find the file labeled “functions.php” and open it.
- Add the following code to your functions.php file, replacing “your-custom-sidebar-name” with the name you’ve chosen for your custom sidebar:
function custom_sidebar() {
register_sidebar( array(
'name' => 'Your Custom Sidebar Name',
'id' => 'your-custom-sidebar-name',
'before_widget' => '<div class="widget">',
'after_widget' => '</div>',
'before_title' => '<h2 class="widget-title">',
'after_title' => '</h2>'
));
}
add_action( 'widgets_init', 'custom_sidebar' );- Save your changes.
Step 3: Add Widgets to Your Custom Sidebar
Now that your custom sidebar is created, it’s time to add some widgets to it. This is where you’ll be able to display the content you determined in Step 1.
- Go to Appearance > Widgets in your WordPress Dashboard.
- Find the widget you want to add to your custom sidebar and drag it into the corresponding area for your custom sidebar.
- Configure the widget to your liking.
- Repeat this step for any additional widgets you want to add to your custom sidebar.
Step 4: Display Your Custom Sidebar on Your Site
Now that you’ve created your custom sidebar and added some widgets to it, it’s time to display it on your site. There are a few different ways to do this, depending on where you want your custom sidebar to appear:
- Display the Custom Sidebar on All Pages
- Display the Custom Sidebar on Specific Pages or Posts
Option 1: Display the Custom Sidebar on All Pages
To display your custom sidebar on all pages, you’ll need to add the following code to your theme’s template file:
<!--?php if ( is_active_sidebar( 'your-custom-sidebar-name' ) ) : ?-->
  <aside id="secondary" class="widget-area" role="complementary">
    <!--?php dynamic_sidebar( 'your-custom-sidebar-name' ); ?-->
  </aside><!-- #secondary -->
<!--?php endif; ?-->
This code should be added to the appropriate location in your theme’s template file, usually the sidebar.php file.
Option 2: Display the Custom Sidebar on Specific Pages or Posts
To display your custom sidebar on specific pages or posts, you’ll need to install and activate the Custom Sidebars plugin (if you haven’t already). Once the plugin is installed, follow these steps:
- Go to the Edit screen for the page or post where you want to display your custom sidebar.
- Scroll down to the “Custom Sidebars” section.
- Select your custom sidebar from the drop-down menu.
- Update or publish the page or post.
Final Thoughts
And there you have it, a step-by-step guide on how to create a custom sidebar in WordPress. With a custom sidebar, you can take your website to the next level by adding dynamic and personalized content to your pages and posts.
Whether you use a plugin or add the code manually, creating a custom sidebar in WordPress is a relatively straightforward process that can have a big impact on the user experience of your site. So why wait? Start creating your custom sidebar today!