
Tips To Create A Custom WordPress Taxonomy
Ah, the world of WordPress. Where you can create custom pages, custom menus, custom anything really…except maybe custom unicorns (yet). But did you know that you can even create a custom taxonomy in WordPress? That’s right, you too can join the ranks of the WordPress elite and bask in the glory of a custom taxonomy.
But what is a taxonomy, you ask? Don’t worry, we’ll cover all that and more in this article on “How to Create a Custom WordPress Taxonomy.”
Table of Contents
What is a Taxonomy in WordPress?
First things first, let’s define what a taxonomy is in WordPress. A taxonomy is a way to group and organize content within your WordPress site. The two most common taxonomies in WordPress are categories and tags. But what if you need a more specific grouping method for your content? That’s where creating a custom taxonomy comes in.
Custom taxonomies allow you to create your own terms and categories for organizing content. For example, you might create a taxonomy for “Movies” and add terms like “Action”, “Comedy”, and “Drama”. You could also create a taxonomy for “Authors” and add terms like “Fiction”, “Non-Fiction”, and “Poetry”.
Why Create a Custom WordPress Taxonomy?
Now that you know what a taxonomy is, you might be thinking, “Why would I want to create a custom wordpress taxonomy?” Well, here are a few reasons:
- To better organize your content: If the standard categories and tags just aren’t cutting it for your site, a custom taxonomy can provide a more specific method of organization.
- To separate your content: Maybe you want to keep certain posts separate from others. A custom taxonomy can help with that.
- To show off your WordPress skills: Let’s be real, creating a custom taxonomy is a pretty impressive feat. Show off your WordPress knowledge to your friends, family, and even that cute person you met at the coffee shop.
The Nitty-gritty of Creating a Custom WordPress Taxonomy
Now that you know why you might want to create a custom taxonomy, let’s get down to the nitty-gritty of actually creating one. There are two main ways to do this: through code or through a plugin.
Option 1: The Code Route
Code can be intimidating, but don’t worry, creating a custom taxonomy through code is actually quite simple. Here’s a basic outline of what you’ll need to do:
Define The Taxonomy
Defining the taxonomy involves specifying the labels, arguments and other properties for the taxonomy. Labels include the name of the taxonomy, its singular and plural forms, and other similar descriptive elements. Arguments include the type of post it should be associated with, whether it should be hierarchical or flat, and other properties.
Register The Taxonomy
Once the taxonomy has been defined, it needs to be registered with WordPress. This is done by calling the register_taxonomy() function and passing the defined taxonomy to it. Registering the taxonomy makes it accessible to WordPress and available for use in your site.
Add The Taxonomy to Your Post Type
To make the taxonomy available for use in your site, it needs to be added to a post type. This is done by calling the ‘register_taxonomy_for_object_type()’ function and passing the post type and the taxonomy to it. Once the taxonomy is added to a post type, it can be used to categorize and classify the posts in that post type.
By following these steps, you can create a custom WordPress taxonomy and use it to categorize and organize your posts in a way that makes sense for your site.
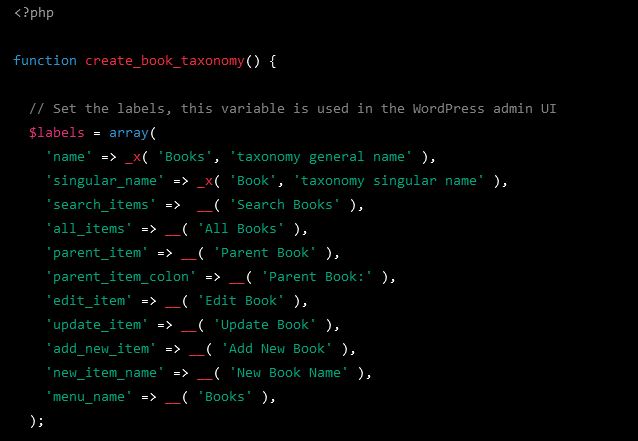
Here’s an example of how you can create a custom taxonomy in WordPress using code:
<?php

function create_book_taxonomy() {

  // Set the labels, this variable is used in the WordPress admin UI
  $labels = array(
    'name' => _x( 'Books', 'taxonomy general name' ),
    'singular_name' => _x( 'Book', 'taxonomy singular name' ),
    'search_items' =>  __( 'Search Books' ),
    'all_items' => __( 'All Books' ),
    'parent_item' => __( 'Parent Book' ),
    'parent_item_colon' => __( 'Parent Book:' ),
    'edit_item' => __( 'Edit Book' ),
    'update_item' => __( 'Update Book' ),
    'add_new_item' => __( 'Add New Book' ),
    'new_item_name' => __( 'New Book Name' ),
    'menu_name' => __( 'Books' ),
  );

  // Register the taxonomy
  register_taxonomy(
    'book',  // The name of the taxonomy
    'post',  // The post type to associate the taxonomy with
    array(
      'hierarchical' => true,
      'labels' => $labels,
      'show_ui' => true,
      'show_admin_column' => true,
      'query_var' => true,
      'rewrite' => array( 'slug' => 'book' ),
    )
  );
}

// Hook the taxonomy creation into the 'init' action
add_action( 'init', 'create_book_taxonomy' );

?>
This code creates a custom taxonomy named “Books” that is associated with the “post” post type. The $labels variable is used to specify the names for the taxonomy, and the register_taxonomy function is used to register the taxonomy.
The hierarchical argument is set to true, which means that the taxonomy will have a parent-child relationship, allowing you to create categories and subcategories. The other arguments in the register_taxonomy function control the display of the taxonomy in the WordPress admin UI and the behavior of the taxonomy when querying posts. The code is hooked into the init action to ensure that the taxonomy is created when the WordPress site is initialized.
Option 2: The Plugin Route
If the thought of coding makes you want to run for the hills, fear not! There are plenty of plugins available in wordpress repository that will make you create a custom WordPress taxonomy in a breeze.
Make your custom taxonomy work for you
Now that you have a custom taxonomy set up, it’s time to make it work for you. Here are a few ways to utilize your new taxonomy:
- Use it in your templates: Use your custom taxonomy in your templates to display related content on your site.
- Use it for navigation: Create a custom menu using your custom taxonomy to provide easy navigation for your users.
- Show it on your post: Display your custom taxonomy on your post so users can see how it’s organized.
Make it Pretty With CSS
Your custom WordPress taxonomy doesn’t have to be just functional, it can also be visually appealing. By using CSS, you can give it some personality and make it stand out on your site. Here’s an expanded explanation of each aspect of making your custom taxonomy pretty with CSS:
- Add colors: Adding colors to your custom taxonomy helps create a cohesive look that matches the overall design of your website. You can use your brand colors, or choose colors that complement your design to make your custom taxonomy visually appealing.
- Make it responsive: With the increasing use of mobile devices, it’s important to make sure that your custom taxonomy looks good on all devices, including desktop, tablet, and mobile. By using responsive CSS, you can ensure that your custom taxonomy is optimized for different screen sizes and looks good on any device.
- Use hover effects: Adding some interactivity to your custom taxonomy can make it more engaging for your users. Using hover effects, such as changing the background color or adding a drop shadow, can add a touch of animation to your custom taxonomy and make it more visually appealing.
- Get creative: Don’t be afraid to get creative with your custom taxonomy styling. You can use different font sizes, styles, and even images to make your custom taxonomy truly unique and visually appealing. Be bold and experiment with different CSS techniques to create a custom taxonomy that stands out on your site.
By following these tips, you can take your custom WordPress taxonomy to the next level and make it not only functional but also visually appealing.
Maintenance is Key
Just like with any other aspect of your WordPress site, it’s important to keep your custom taxonomy up-to-date and well-maintained. Here are a few things to keep in mind:
- Update regularly: Make sure to regularly update your custom taxonomy to keep it running smoothly.
- Check for compatibility: Before updating, always check for compatibility with any other plugins or themes you have installed.
- Back it up: Always back up your custom taxonomy before making any changes, just in case something goes wrong.
Tips and Tricks
Here are a few tips and tricks to help make the process of creating a custom taxonomy even easier:
- Keep it simple: When naming your custom taxonomy, keep it simple and easy to understand.
- Use descriptive names: Use descriptive names for your taxonomy terms to make it easier for users to understand what each one is about.
- Make it user-friendly: When creating your custom taxonomy, keep your users in mind. Make it user-friendly and easy for them to navigate.
Conclusion
Creating a custom taxonomy in WordPress can seem like a daunting task, but with the right tools and a little bit of know-how, it’s actually quite simple. Whether you go the code route or the plugin route, a custom taxonomy can provide a more specific method of organizing your content and make it easier for users to navigate your site.
And don’t forget to make it pretty with some CSS styling! With these tips and tricks in mind, you’re on your way to creating a custom WordPress taxonomy that will impress even the most seasoned WordPress pro.